Monthly Archives: October 2018

How to move a Linux system rooted on zfs onto a new pool / disk

The motivation for this action was that I had a fully-loaded (6-drive) NAS using RAIDZ2 across the 6 x WD Red 8TB disks.   I wanted to optimize performance and noticed that a common thread on the internet is that this is a poor choice for performance.   Studying the documentation shows that RAIDZ2 is also a poor choice for flexibility – i.e., you cannot easily take a disk out of such an array and repurpose it.

So I decided to bite the bullet and move my zpool contents to a new mirror-based pool.
My NAS build is fairly recent, so the entire data will fit on a single disk.  It’s also an opportunity
to throw stuff I don’t need to keep away.

For first zfs set up,  I followed much of the following:  https://github.com/zfsonlinux/zfs/wiki/Ubuntu-18.04-Root-on-ZFS

This is what I did to move to the new pool:

  1. Checked my backup was up to date and complete.
  2. Offlined one of the devices of the RAIDZ2 array. This left the original pool in a degraded, but functional state.
  3. Cleared the disk’s partition table with gdisk (advanced)
    1. Note, I tried re-using the disk (partition2) as a new pool.   ZFS was too clever for that, and knew it was part of an existing pool (even with -f).  Even when I’d overwritten the start of the partition with zeros,  zfs still knew.  It think it must associate the disk serial number in the original pool.
    2. The way I bludgeoned zfs into submission was to overwrite the partition table, and physically move the device to a new physical interface (in my case to a USB3/SATA bridge).  I don’t know if both of these were necessary.
  4. Created a new pool on the disk.  Note,  zfs wouldn’t create it on the partition I’d set up, but would on the whole disk.  Some of the work in 3.2 above might have been unnecessary.
  5. Copied each dataset I wanted to keep onto the new disk using zfs send | zfs recv. Note that this loses the snapshot history.
  6. Set the new root dataset canmount=off, mountpoint=none.  If you don’t do this, the boot into the new root will fail,  but you can recover from this failure by adjusting the mountpoint from the recovery console and continuing.
  7. In the new copied root, use the mount –rbind procedure to provide proc, sys, dev and boot.  Chroot to the new root. (see https://github.com/zfsonlinux/zfs/wiki/Ubuntu-18.04-Root-on-ZFS).  In the chroot:
    1. update-initramfs updates the new /boot.
    2. update-grub to create the new /boot/grub/grub.cfg file.
      1. I edited this to change the name of the menuentry to “Ubuntu <pool-name>” so that I could be sure I was booting the right pool.
    3. grub-install on one of the old disks
      1. The zfs pool on the whole disk means there is nowhere for the grub boot loader on the new pool disk.   As the old pool disks were physically present and did have the necessary reserved space,  I could use one of them to store the updated boot loader.
  8. reboot, select BIOS boot menu,  boot off the hard disk with the new grub installation
  9. This should boot off the new pool.
  10. Export the old pool.
    1. You might need to stop services such as samba and nfs that are depedent on the old pool first.
  11. Set up mountpoints from the new datasets
  12. Edit any other dependencies on the new pool name (e.g. virtual machine volumes)
  13. Now you are running on the new pool.
  14. Once you are absolutely sure you have everything you need from the old pool, import it and then destroy it.
  15. Do a label clear on each of the partitions to be used in the new new pool.
  16. Create the new new pool using the disks from the old pool.
  17. Repeat 5-14 to move everything to the new new pool. Except,  install the grub bootloader on all the disks used by the pool, excluding the one booting the new pool.
    1. This means you can boot into the new pool if the new new pool is broken.
  18. Export the new pool.
    1. Keep the disk for a while in case you left anything valuable behind on the move to the new new pool.
  19. Eventually, when you are happy that nothing was left behind,  import, destroy and labelclear the disk/partition used for the new pool,  and add the disk/partition to the new new pool.  Also update the boot loader on the disk that was booting the new pool.

Upgrading pfsense using a virtual environment

Summary of the running network environment

  • Pfsense runs as a virtual machine
  • There is a single trunk Ethernet connected to the host
  • The WAN connection arrives on VLAN10, courtesy of a managed switch feeding the trunk
  • The LAN connection is untagged
  • Additional VLANs provide connectivity for wireless LANs

I discovered that my pfsense was in a state where it could not update itself either from the GUI, or from the command line.   The reasons are not relevant to this item.   I wanted to rebuild it and keep the same configuration.

The challenge is how to build a pfsense instance with the same configuration, with minimum disturbance of the old configuration.

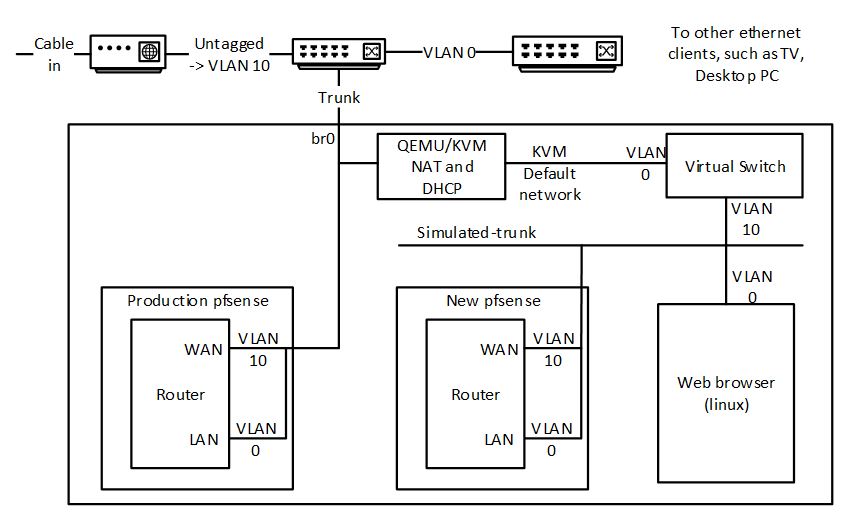
The solution is to create a virtual network environment that mirrors key aspects of the production environment.   The virtual network environment is created using features of the QEMU KVM virtualization environment, and is driving using the virt-manager gui.

  • Prerequisites
    • Sufficient host resources to run an additional 3 virtual machine instances
    • Connectivity to the host via virt-manager that is not dependent on the production pfsense instance
      • My host ran a VNC desktop session. I connected to this session from a Windows machine on VLAN0 from an interface that was configured with a static IP address.
      • I then ran virt-manager in this session, plus a root terminal to set up instance storage (using zfs).
    • Host access to the new pfsense installation image, in my case pfsense 2.4.4 AMD64.
    • My internet provider (Virgin Media) did not give me a DHCP lease unless the interface performing DHCP had a specific MAC address. The interface connecting to WAN has to be configured to spoof this address, by specifying the MAC address of the LAN (i.e., the non-tagged physical) interface in pfsense.   This configuration persists into the new instance, so the MAC addresses configured in QEMU/KVM for the virtual machines can be anything.  This is a necessary, as qemu/kvm doesn’t allow duplicate MAC addresses to be configured.
  • Create a new network in kvm that is not connected to anything, and has no IP configuration. Call this simulated-trunk.
  • Create a pfsense instance “switch” with two NICs, one connected to the default network (NAT to all physical devices),  one connected to simulated-trunk.
    • During installation, configure the “default” interface as WAN.
    • Configure VLAN 10 on “simulated-trunk” and assign to LAN.
    • This instance simulates the hardware managed switch used to place the incoming WAN on VLAN 10.
  • Create a pfsense instance “new” with a single NIC on “simulated-trunk”
    • During installation, configure VLAN 10 as WAN, and untagged as LAN.
  • Create a linux instance “app” of your favourite distro on “simulated-trunk”. This is needed to access the pfsense GUI.  This instance will be given an IP address in the 192.168.1.0/24 range.
  • Do a backup of the production pfsense GUI “prod” and put it in “app”. There are undoubtedly lots of ways to do this.  What I did was to temporarily attach a second NIC to the “app” virtual machine linked to the host “br0”.  I could then access host resources and copy the file.
    • I also downloaded and saved /root/.ssh/id_rsa used indirectly by my acme configuration.
  • Connect to the “new” pfsense gui from “app”, which is probably at 192.168.1.1.
    • Install any packages used by the production environment.
    • Do a restore from the backup file.
    • At this point, if it worked, “new” will reboot. Follow progress on the virt-manager instance console.  The boot should complete showing the production interfaces and their assigned IP addresses.
  • Pause “prod” and “new” pfsense instances
  • In virt-manager, change the network of “new” to its production value (br0 in my case).
  • There should be no further need for “app” or “switch”
  • Un-pause “new”
  • Using a web browser, connect to the “new” gui, now on the production network.
    • Go to status/interfaces.
    • Renew the IP address of the WAN interface. You should see it get an IP address, which will most likely to be the same one as previously provided.
    • Do any final adjustment. In my case, I created /root/.ssh from the console,  uloaded /root/.ssh/id_rsa from Diagnostics/Command Line, and set permissions to 400 from the console.  I tested that my acme scripts worked, and were placing a copy of the certificates into a directory on my web server using scp.
  • Do some sanity testing, but it should all be working now.
  • Connect the old “prod” instance of pfsense to the simulated-trunk and power it down, or just power it down. You can keep this as a backup.  You can switch back to it by switching the QEMU/KVM settings for the NIC network.  Obviously,  don’t have them connected to the same network and running at the same time.